使用OpenStack实现Auto Scaling

Quake Wang

twitter.com/quakewang

Auto Scaling简介

  • Auto Scaling是指自动给应用按需增加或者减少计算资源。
  • 在实施云计算之前,实现Auto Scaling很困难,当应用已经达到使用硬件资源的上限,需要要再购买硬件资源以及进行OS/应用等安装。
  • 在实施云计算之后,构建Auto Scaling的应用才变为可能,才能实现按需分配。

为什么需要Auto Scaling

  • 处理计划内(促销/节日/开新服)和计划外的突发应用高峰
  • 不仅仅是scale-up,更重要的是scale-down,节约成本

几种适合作Auto Scaling的场景

  • Web Server,根据并发请求数或者带宽使用情况来作scale-up/down
  • Queue Server,根据队列里剩余的数量来作scale-up/down
  • DB Server不适合

Web Server Auto Scaling实际例子

可扩展的架构 Haproxy + Nginx
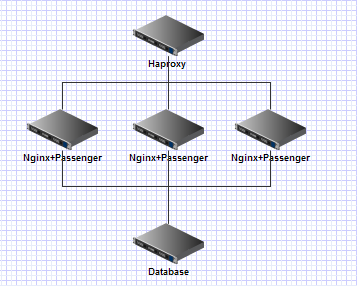
frontend http-in
        bind *:80
        default_backend servers

backend servers
        stats uri /admin?stats
        balance roundrobin
        server server1 10.199.18.11:80 maxconn 512
        server server2 10.199.18.12:80 maxconn 512
        server server3 10.199.18.13:80 maxconn 512
                

在OpenStack创建instance和snapshot

创建instance,安装好nginx以及应用

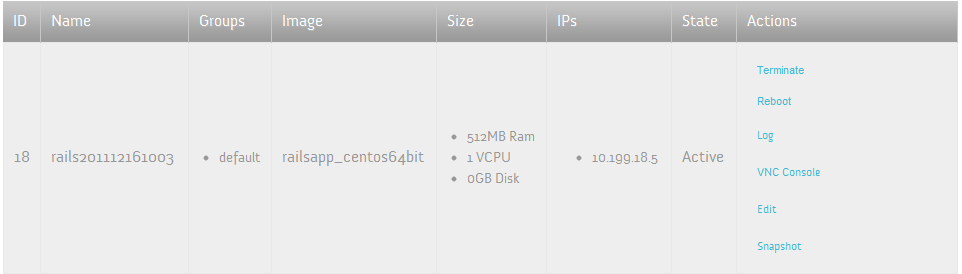
对这个instance作一次snapshot

Scale up/down

  • Up: 通过snapshot launch更多的instance
  • Down: terminate过多的instance
  • Demo: Haproxy application test url
  • 需要手工添加/减少instance和手工修改haproxy配置
  • 可以快速Scale,但还不是自动

Auto Scaling脚本 - Add Server

OpenStack有多种语言的客户端(Python/Ruby/Php/Java/Curl),这里用Ruby的openstack-compute作例子:
require 'rubygems'
require 'openstack/compute'

auth_url = 'http://10.199.21.210:5000/v2.0/' #OpenStack keystone auth url
image_id = '9'
flavor_id = '1'

cs = OpenStack::Compute::Connection.new(:username => 'username', :api_key => 'password', :auth_url => auth_url)
image = cs.get_image(image_id)
flavor = cs.get_flavor(flavor_id)

newserver = cs.create_server(:name => "rails#{Time.now.strftime("%Y%m%d%H%M")}", 
    :imageRef => image.id, :flavorRef => flavor.id)
puts "New Server #{newserver.name} created"

while newserver.progress < 100
  puts "Server status #{newserver.status}, progress #{newserver.progress}"
  sleep 10
  newserver.refresh
end
puts "Server status #{newserver.status}, progress #{newserver.progress}"
puts "Done"
          

Auto Scaling脚本 - Run Add Server

Demo时间,执行这个脚本:
# ruby create_new_server.rb  
New Server rails201112161042 created
Server status BUILD, progress 0
Server status ACTIVE, progress 100
Done
          
差不多30秒左右的时间,这台虚拟机就创建好了,我们可以在dashboard看到这台最新的instance。

Auto Scaling脚本 - Update Haproxy

再写一个脚本,自动更新haproxy的配置文件:
cs = OpenStack::Compute::Connection.new(:username => 'username', :api_key => 'password', :auth_url => auth_url)
#预先定义一个haproxy template文件,backed server集群部分定义留空,将它拷贝过来
`cp haproxy.cfg.template haproxy.cfg`

File.open('haproxy.cfg', 'a') do |f|
  cs.servers.each do |s|
    server = cs.server(s[:id])
    #如果该实例的镜像等于我们之前做的snapshot,将它的IP加入配置文件
    if server.image['id'] == image_id
      ip = server.addresses.first.address
      puts "Found matched server #{server.name} #{ip}, add to haproxy"
      f.puts "        server #{server.name} #{ip}:80 maxconn 512"
    end
  end
end

#覆盖旧的haproxy配置文件,reload haproxy
`cp haproxy.cfg /etc/haproxy.cfg`
puts "Reload haproxy"
`/etc/init.d/haproxy reload`
          

Auto Scaling脚本 - Run Update Haproxy

Demo时间,执行这个脚本:
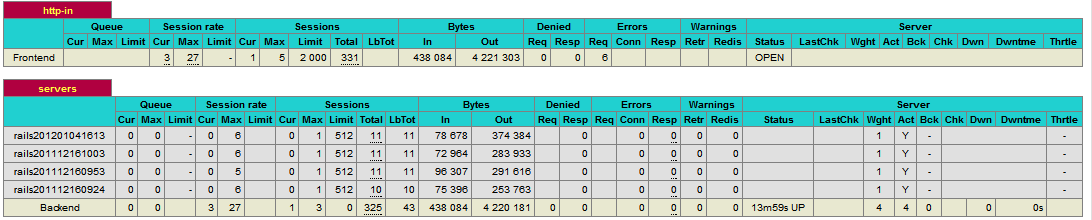
# ruby update_haproxy.rb  
Found matched server rails201112161042 10.199.18.6, add to haproxy
Found matched server rails201112161003 10.199.18.5, add to haproxy
Found matched server rails201112160953 10.199.18.4, add to haproxy
Found matched server rails201112160924 10.199.18.8, add to haproxy
Reload haproxy
          

Haproxy Statistics

Auto Scaling的条件选择

根据Haproxy Statistics CSV Export或者Unix Socket,获取当前的Sessions数

require 'socket'
require 'csv'

stats = UNIXSocket.open("/var/run/haproxy.socket") {|s|
  s.send "show stat\n", 0
  s.read
}

stats = CSV.parse stats

current_instances = stats.size - 4
current_sessions = stats[stats.size - 2][4].to_i
avg_session_num = current_sessions / current_instances
puts "current sessions: #{current_sessions}"
puts "current instances: #{current_instances}"
puts "current sessions per instance: #{avg_session_num}"
          

根据条件作scale up/down

  • 大于某个指标,执行创建instance的脚本
  • 小于某个指标,执行销毁instance的脚本
if avg_session_num > 800
  add_new_server
  update_ha_proxy
elsif avg_session_num < 100
  terminate_server
  update_ha_proxy
end
                
#ruby auto_scale.rb 800 100
current sessions: 1800
current instances: 2
current sessions per instance: 900
create new instance
                

Auto Scaling不仅仅是OpenStack才有

  • Amazon, Rackspace, Libvirt...只要有API,就能实现
  • Fog - 提供各种云计算平台的统一接口
  • Rightscale - 提供集成监控的Auto Scaling设置

为什么选择OpenStack?

  • Amazon, Rackspace在国内访问速度不佳,还有你懂的功夫网
  • 国内目前没有成熟的公有云
  • OpenStack搭建私有云,很适合国内目前的网页游戏,SNS应用,电子商务等行业

为什么DB Server不适合Auto Scaling?

  • Master/Slave,同步问题,可以scale-up slave,但是很难scale-down,
  • DB Shard,根据Hash/Key来分布存储,可以scale-up,但是无法scale-down
  • 大家有什么好办法?

Q&A