Ruby on Rails 教程 (01)
玩具应用
做一个微博玩具应用
$ cd ~/workspace
$ rails new toy_app
$ cd toy_app/
$ git init
$ git add -A
$ git commit -m "Initialize repository"
$ git remote add origin git@bitbucket.org:quake/toy_app.git
$ git push -u origin --all
Model
一般来说,开发 Web 应用的第一步是创建数据模型(data model)
| users | |
| id | integer |
| name | string |
| string | |
Model
| microposts | |
| id | integer |
| content | text |
| user_id | integer |
脚手架(scaffold)
$ rails generate scaffold User name:string email:string
DB Migrate
$ bundle exec rake db:migrate
启动应用
$ rails server
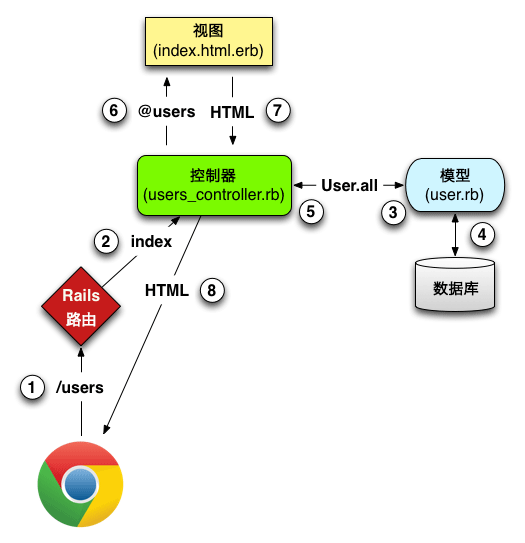
访问用户列表
http://localhost:3000/users| URL | 动作 | 作用 |
| /users | index | 列出所有用户 |
| /users/1 | show | 显示 ID 为 1 的用户 |
| /users/new | new | 创建新用户 |
| /users/1/edit | edit | 编辑 ID 为 1 的用户 |
启动项目
$ rails server
MVC
models / views / controllers
脚手架生成微博模型
$ rails generate scaffold Micropost content:text user_id:integer
$ bundle exec rake db:migrate
REST架构
表现层状态转化(Representational State Transfer)
| HTTP 请求 | URL | 动作 | 作用 |
| POST | /microposts | create | 创建新微博 |
| PATCH | /microposts/1 | update | 更新 ID 为 1 的微博 |
| DELETE | /microposts/1 | destroy | 删除 ID 为 1 的微博 |
限制微博内容的长度
#app/models/micropost.rb
class Micropost < ActiveRecord::Base
  validates :content, length: { maximum: 140 }
end
建立关联(association)
#app/models/user.rb
class User < ActiveRecord::Base
  has_many :microposts
end

#app/models/micropost.rb
class Micropost < ActiveRecord::Base
  belongs_to :user
  validates :content, length: { maximum: 140 }
end

Rails Console
$ rails console
>> first_user = User.first
>> first_user.microposts
>> micropost = first_user.microposts.first
>> micropost.user
>> exit
课后练习
- 微博模型的存在性验证 presence: true
- 用户模型中加入存在性验证 name和email